Replacing a John Deere tractor belt might seem daunting, but with careful attention and this guide, you can successfully handle the job. This guide compares different approaches, ensuring you choose the method best suited to your tractor model and skill level. Remember, safety is paramount! Always disconnect the spark plug and engage the parking brake before beginning. For added comfort, consider a tractor seat upgrade.
Identifying the Right Belt and Gathering Supplies
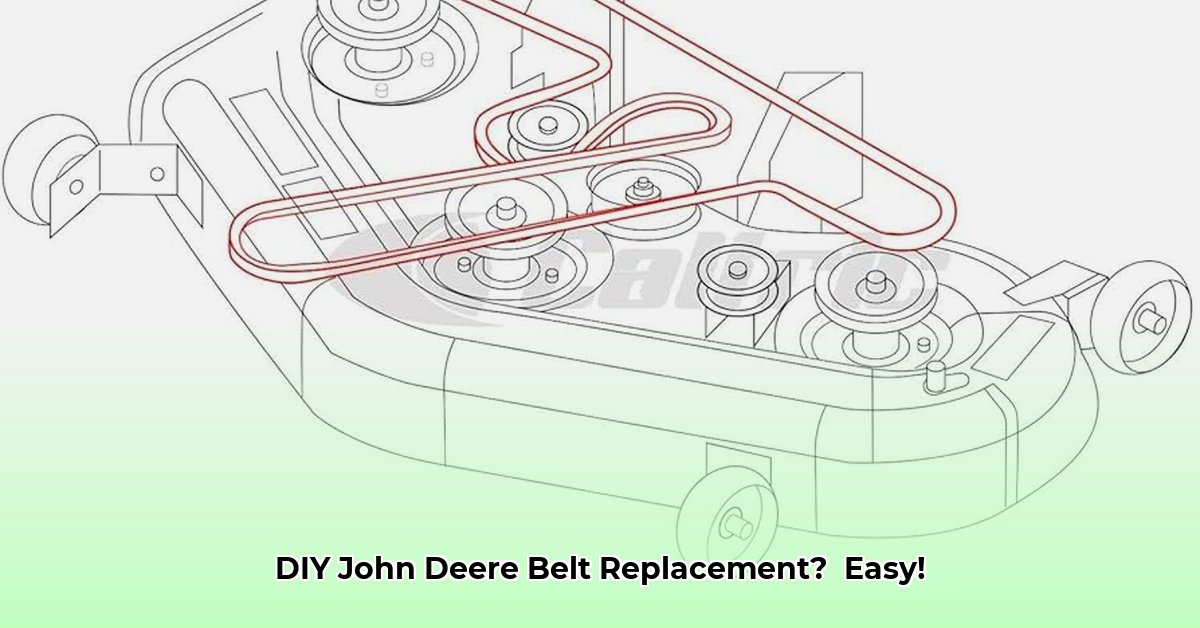
Before you begin, correctly identify the belt requiring replacement (mower deck, main drive, etc.). Your John Deere tractor's model number is crucial. It dictates the specific belt size and type needed. Consult your owner's manual—it contains diagrams and precise specifications to guide you. Guessing the belt size is never a good idea; using an incorrect belt can cause damage to your tractor.
Step-by-Step Replacement Guide
Remember, every John Deere tractor model differs slightly. This guide provides a general overview; always consult your owner's manual for model-specific details.
Step 1: Preparation is Key
- Gather Tools: Assemble the necessary wrenches (sizes vary by model; check your manual), socket set, screwdrivers, and the new replacement belt.
- Consult Your Manual: Thoroughly review your owner's manual. Understanding your specific tractor model's layout is essential.
- Prepare Workspace: Ensure adequate space around your tractor for comfortable and safe working conditions.
- Document the Process: Before disassembling anything, take photos or create detailed diagrams. This aids in reassembly, ensuring everything goes back correctly. This step drastically reduces the potential for errors.
Step 2: Accessing the Belt
The belt's accessibility varies widely between models. Some tractors only require the mower deck lift, while others necessitate removing side panels or the entire belt cover. Your owner's manual provides visual guidance and specific instructions.
Step 3: Releasing Belt Tension
Most John Deere tractors have a tensioner mechanism. Loosen this mechanism before removing the belt. The method varies significantly among models. Your owner's manual explains the exact steps involved. Incorrect tension release can lead to belt damage.
Step 4: Belt Removal and Installation
Gently remove the old belt, closely observing its path around pulleys and wheels. Take pictures or make notes for reassembly. Install the new belt, precisely following the old belt's path. Improper alignment leads to premature wear and belt slippage.
Step 5: Tension Adjustment and Verification
After installing the new belt, adjust the tension correctly. Too tight a belt wears out quickly; too loose, and it slips. Consult your owner's manual for appropriate tension guidelines. After adjusting, once again check the belt's path to ensure proper alignment.
Step 6: Reassembly and Testing
Carefully reassemble all components, ensuring everything is securely fastened. Double-check your work before proceeding. Start the engine and confirm the belt drives all components smoothly.
Troubleshooting Common Issues
Even with careful work, problems can arise:
Belt Slippage: Incorrect tension or alignment is the frequent culprit. Carefully review your work, ensuring proper tension and alignment. Worn pulleys can also contribute to slippage. (Solution: Check tension; replace belt if worn; inspect pulleys for wear)
Belt Breakage: Incorrect installation, excessive tension, or a worn pulley causes belt breakage. ( Solution: Review installation instructions; inspect pulleys for wear. Use the correct replacement belt.)
Incorrect Belt Routing: Consult your owner's manual diagram. Misrouting causes slippage and premature belt failure. ( Solution: Carefully review the routing diagram in your owner's manual. )
Preventative Maintenance: Extending Belt Lifespan
Regular inspections are crucial. Check belts frequently for wear (fraying, cracking, etc.). Preemptive maintenance significantly extends the life of your equipment, reducing the frequency of replacements. Cleaning and lubrication of the belt routing area is important and will help prevent premature wear and tear.
This guide aims to assist you, but your owner's manual remains the ultimate resource. Take your time, exercise caution, and seek professional assistance if uncertain about any step. Remember, safety and thoroughness prevent costly mistakes and ensure a successful belt replacement.